 |
| Via www.udemy.com |
“I am curious how pictures are taken and saved.” --Jameson Gannon, 14
It’s hard to imagine a world without digital cameras. While some die-hard photographers still insist that old-fashioned chemically-reactive film produces better photographs, it’s hard to argue against digital cameras’ ease of use and convenience. Turning that gorgeous sunset or that sumptuous-looking meal that your eyes see into a picture file to share with your friends? It’s a pretty remarkable feat! It also takes more steps than you’d expect.
Your Selfie is Made of Electrons
To break this process down, let’s think about what makes an “image” to begin with.
| Grass is green because it reflects the green wavelength of light. Via Okidata.com. |
To put together a picture, you need not just all these color signals, but the location of each of these colors. Digital cameras keep the locations of each color straight by splitting the picture into pixels--colored dots that can be easily represented in binary code. You might have heard someone discussing the quality of a camera in terms of resolution, or how many pixels it splits the image into. A high-resolution camera will record data for many pixels, making the image sharper, the colors richer, and the size easier to change without pixilation or distortion. A low-res camera will be grainier, but with less information to convey, its photos will be a smaller file size. One isn’t necessarily better than the other for every application, but when buying a camera it’s better to err on the side of higher resolution, since you can always compress a picture file to make it smaller (more on that later). The average cell phone camera these days has around 8 megapixels of resolution, meaning it can record a grid of around 8 million pixels!
 |
| An image taken with high resolution, medium resolution, and low resolution. Which one would you want to use? Via Wikipedia. |
How does a camera “see” color?
| A silicon chip, called a "charge-coupled device" CCD) in the business. Via LetsGoDigital.org |
 |
| Any photo can be split into red, green, and blue components. Via podeplace.blogspot.com. |
But wait! These charges are still analog signals, whereas a computer can only understand digital signals. So an analog-to-digital converter, made of tiny transistors, steps in to do the job. Taking the amount of charge conveyed after each filter, it supplies four numbers describing each pixel, all in binary code: the pixel’s location in the grid, the brightness of the red component, the brightness of the green, and the brightness of the blue. The color that’s the brightest across all three colors is white (you’ve encountered this if you’ve ever worked with #ffffff, or white’s hex-color on the web).
Saving and Compression
 |
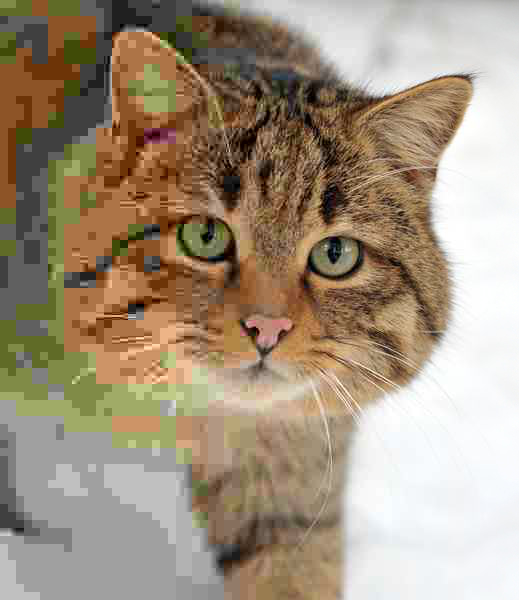
| This picture is compressed heavily on the left side, but not as much on the right. Notice the difference? Via Wikipedia. |
Finally, you can take that saved file on your camera’s card or storage device, upload it to your computer, and share it with the world! Some digital cameras and most smartphones can upload these files through wifi, without even needing a physical storage device for the transfer. It’s all thanks to the hard work done by your camera to translate a bunch of stray electrons into 1’s and 0’s, and then into the pixels that make up your photos!
Learn More!
To learn more about the technology behind photo taking and editing, check out the following online resources!
- NASA uses lots of camera and optics technologies to look deep into space.
- Watch Top Gear host and all around funny Brit James May explain more about digital cameras!
- This ShortCourse article explains a little more about color filtering patterns.
You can also get electrified by light and circuitry at the following events at the Cambridge Science Festival:
- Lightbox Navigations at the Harvard Art Museum, April 15 - 24, 12:30 PM - 1:00 PM. See how museum conservationists preserve artwork from the harmful effects of light--and how they're digitizing their collection! Free!
- Paper Circuits in the MIT Museum Idea Hub, Saturday, April 16, 12:00pm- 4:00pm. If all these tiny chips and sensors get you charged up, you can come and build your own! Free with Museum admission.
- Explore more light and sound experiments at the Museum of Science, which is hosting a slew of activities throughout the festival!
----------------------
E. Rosser is a science writer and mechanical engineer currently wrapping up a degree at MIT. She doesn’t know much about photography, so this question provided a great chance to learn! When she does reach for the camera, it’s usually to take a cute picture of her pet rats, Ellen and Darwin. She learned today that maybe she should use a faster shutter speed, since they always scamper around so quickly that they look like a blur...
 |
| Ellen and Darwin are camera shy. |

Hi, I truly inspire from these blog. You are doing a really a good job & provide us such a gr8 information on Digital Camera & their working. Thanks once again.
ReplyDeleteYou can get more reference to this book: selfie camera Website to know more about the Photos app
ReplyDelete